Recent Update

Add a blog counter widget to your blog


Friends how are you? In my post I will share you a nice widget. When we visit other’s site we see that there has a counter where show number of visitors, visitor’s country, daily visitors etc. I think it is a very good widget. You can add this widget and you can know about your visitors. So friends if you like this follow me.

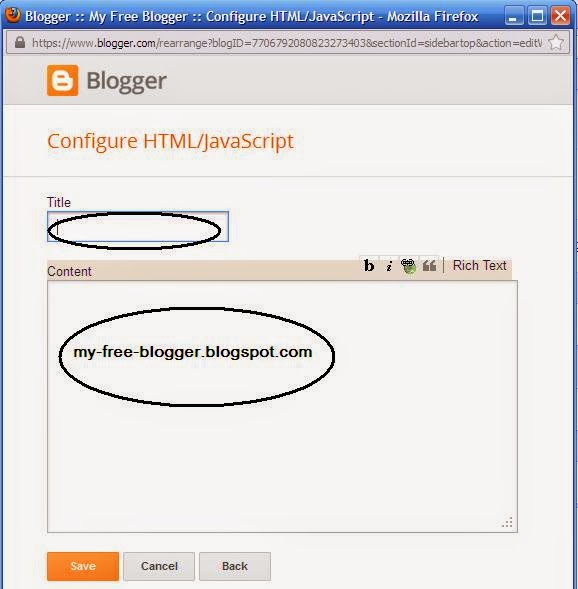
Log in to your bolgger. www.blogger.com Now you will get your Dashboard. From here click “Layout” option. Layout panel will appear. Select “Ad a gadget”. Now insert this code.

Code:  (Only for number of visitor)


<!– BEGIN: http://my-free-blogger.blogspot.com –>
<center><script type=”text/javascript” src=”http://widget.supercounters.com/online_t.js”></script><script type=”text/javascript”>sc_online_t(400029,”Users Online”,”#ff0000″);</script><br><noscript><a href=”http://www.supercounters.com/”>Free Tumblr Users Online Counter</a></noscript>
</center>
<!– END: http://my-free-blogger.blogspot.com –>
 

Now save this widget.

Note:
Is it useful for you? If you like this post or face any problem please give your valuable comment and visit this site regularly to get more tips and tricks for blogger.


Some SEO Friendly Templates

How are you all? Many of us has a blog or websites. And we make our blog so attractive by many templates. In my post I will share with you some seo friendly templates. If you have any blog in blogger then you can use these templates. By this templates you can make your blog or site more and more attractive. So friends download these templates for free and make your blog seo friendly and attractive.

Template 1:


Template name: Sevim
Column: 2

View Template          Download This    

Template 2:


Template name: Mxfluity
Column: 2


Template 3:


Template Name: Flatui
Column:2

View Template        Download This       


Create A Code Box In Blog post

Hi friends! How are you? In my post I will share with a blogger tips which may help you. It is about “How to create a html or java code box in blogger?” let’s the discussion. We have to make post to blogger blog.  When we write a post to blogger blog sometimes we need to add any code and it looks at random. But when you apply this tip your code will become nice that makes your blog beautiful. It is not a hard task. Just follow me. So strat…………..

Step:1

  1. First log in to blogger
  2. Now you will get your “Dashboard”
  3. From here select “Template”


4. Here select "Edit HTML"
5. Now find the code(Ctrl + F)

]]></b:skin>

Now paste the bellow code before the code
.code { background:#f5f8fa; background-repeat:no-repeat; border: solid #5C7B90; border-width: 1px 1px 1px 20px; color: #000000; font: 13px 'Courier New', Courier, monospace; line-height: 16px; margin: 10px 0 10px 10px; max-height: 200px; min-height: 16px; overflow: auto; padding: 28px 10px 10px; width: 90%; } .code:hover { background: #FAFAFA; background-repeat:no-repeat; }


Now save your template.

Step:2
Now make a post and from here click "HTML". Here type
<div class="code">
 ( Place your desired code )
</div>

Now save post and visit your site.

Note:
Do you like this tips? Is it help you? If you like this post please give your valuable comment and visit this site regularly to get more tips and tricks for blogger.


Sliding Follow Or Like Box For Blogger


My post is for them who has blogger blog. Now I am sharing with you some social widgets for blogger. When we visit other’s blog site, we can see that any one side of the blog has facebook or twitter or google plus icon. And when we keep our mouse cursor in any of these then it slides. Do you want to add these widgets? You can add these widgets to your blog for free.  As a result your visitor will increase. And increase your facebook like or twitter follower. To add these widgets follow my instructions.

Process: 1

Go to blogger. Then log in here with your ID and Password. From here click “Template”. A new page will open like bellow. 


Here select “Edit HTML”. You will get your HTML codes. From here find(Ctrl + F) the bellow code.
                                
</head>

Then paste the bellow code above the the code </head>.

<script src=”https://ajax.googleapis.com/ajax/libs/jquery/1.6.1/jquery.min.js” type=”text/javascript”></script> 


Process: 2

Now go to “Dashboard”. From here select”Layout”. Then select “Ad a gadget”. A new page will reopen. From here select “HTML/Java Scripts”.
Then paste the bellow code.

For facebook like:

 Code:


<script type="text/javascript">
//<!--
$(document).ready(function() {$(".w2bslikebox").hover(function() {$(this).stop().animate({right: "0"}, "medium");}, function() {$(this).stop().animate({right: "-250"}, "medium");}, 500);});
//-->
</script>
<style type="text/css">
.w2bslikebox{background: url("https://blogger.googleusercontent.com/img/b/R29vZ2xl/AVvXsEh-iWfVkmmEU3V5sKAy3NE1kH7RCm4b2aERuOrg1eVl8PntPd2xGxDks-iEdJqXzuQ4QKWVd8gIja4UyTPJPreaewtn6bHn_jaZMqppbhB8HsgVZjhBUYTaSUH9R964pjOJSraOTsCFkaRo/s150/w2b_facebookbadge.pn") no-repeat scroll left center transparent !important;display: block;float: left;height: 270px;padding: 0px 5px 0 40px;width: 245px;z-index: 99999;position:fixed;right:-250px;top:1%;}
.w2bslikebox div{border:none;position:relative;display:block;}
.w2bslikebox span{bottom: 12px;font: 8px "lucida grande",tahoma,verdana,arial,sans-serif;position: absolute;right: 6px;text-align: right;z-index: 99999;}
.w2bslikebox span a{color: #808080;text-decoration:none;}
.w2bslikebox span a:hover{text-decoration:underline;}
</style><div style=""><div>
<iframe src="http://www.facebook.com/plugins/likebox.php?href=http%3A%2F%2Ffacebook.com%2F Your ID&amp;width=245&amp;colorscheme=light&amp;show_faces=true&amp; connections=9&amp;stream=false&amp;header=false&amp;height=270" scrolling="no" frameborder="0" scrolling="no" style="border: medium none; overflow: hidden; height: 270px; width: 245px;background:#fff;"></iframe></div></div>


Note: Change this Your ID with your user name. Then save thee gadget.

For twitter follow:


Code:


<script type="text/javascript">
 
//<!--
 
$(document).ready(function() {$(".twitterboxot").hover(function() {$(this).stop().animate({right: "0"}, "medium");}, function() {$(this).stop().animate({right: "-250"}, "medium");}, 500);});
//-->
</script>
<style type="text/css">
.twitterboxot{background: url("https://blogger.googleusercontent.com/img/b/R29vZ2xl/AVvXsEgblPfWJrzGBzT_rJ9vxJElj3iiJbNf7UAjo2aaMKBIse72WhZTH8PXzYuap5bx5ErqEWXcOUjFS_Q73MaOaheNM9sVtDftdQxUtf4G_Sb9jg4KRSXYRVjM0Aih7Y3DTAPoygCHchDmVFE/s1600/twitterfanbox-OT.png") no-repeat scroll left center transparent !important;
display: block;
float: right;
height: 240px;
padding: 0 5px 0 46px;
width: 245px;
z-index: 99999;
position:fixed;
right:-250px; top:35%;}
</style>
<div><div>
<script type="text/javascript"
src="http://ultimateblogmanager.googlecode.com/files/sliding%20twitter%20box.js"></script><div
id="twitterfanbox"></div><script
type="text/javascript">fanbox_init("Your ID");</script></div></div>

Note: Change this Your ID with your user name. Then save thee gadget.

For Google plus:

<script src="https://ajax.googleapis.com/ajax/libs/jquery/1.6.1/jquery.min.js" type="text/javascript"></script>
<script type="text/javascript">
//<!--
$(document).ready(function() {$(".gplusbox").hover(function() {$(this).stop().animate({right: "0"}, "medium");}, function() {$(this).stop().animate({right: "-330"}, "medium");}, 500);});
//-->
</script>
<style type="text/css">
.gplusbox{
background: url("https://blogger.googleusercontent.com/img/b/R29vZ2xl/AVvXsEjYtKCVS0WpcMeE2ptpDhU5zw2cgppVpXvHqn49DzuKoGCe0IMhYpd_i0nBrllGwyLZD-qrsXNDuqfErpkFwsHJgiQzBlww0Y5XXgFxGvchi0ObbRCoxaBCTJeqyvia8YC4822exh2TpjuK/s1600/g++lordhtml.jpg") no-repeat scroll left center transparent !important;
display: block;
float: right;
height: 330px;
padding: 0 0px 0 46px;
width: 325px;
z-index: 99999;
position:fixed;
right:-330px;
top:60%;
}
.gplusbox div{
padding: 15px;
background: white;
border: 2px solid #D64937;
border-right: 0;
}
</style>
<div><div>
<div data-action="followers" data-height="300" data-href="https://plus.google.com/Your ID" data-source="blogger:blog:followers" data-width="320">
</div>
<script type="text/javascript">
(function() {
window.___gcfg = {'lang': 'en'};
var po = document.createElement('script');
po.type = 'text/javascript';
po.async = true;
po.src = 'https://apis.google.com/js/plusone.js';
var s = document.getElementsByTagName('script')[0];
s.parentNode.insertBefore(po, s);
})();
</script>
</div></div>​

Note: Change this Your ID with your user name. Then save thee gadget.

Do you like this post? If you like this post please give your valuable comment and visit this site regularly to get more tips and tricks for blogger. Friend I am waiting for your valuable comment.


Floating sharing button widget for blogger

Hi everybody! How are you? In this post I will share a nice floating widget for blogger. When we visit other’s site we can see that these sites have different sharing button. Through this widget anyone can share his or her choose able post with his or her friends. As a result the visitor of a site will increase. So you can add this nice widget to your blog. Thus the visitors of your site can share your posts with his friends. As a result you site’s visitor will increase. So try it for you. There are many sharing button widget for blogger. It is one of them. This widget is very nice. It will float in your blog. To add this widget you have to follow two processes. Let’s stat...... 


Process 1:

For this you must log in to your blogger account. After logging in blogger a new page (Dashboard) will open. Here click “Template” option. You will find this “template” option like bellow the image. 


Then a page will open. From here click “Edit HTML”


Now find this bellow code (Find tips: Ctrl +F).

Code:


<head>


After finding this code paste the bellow code (after the code <head>)

Code:


<script type="text/javascript">var switchTo5x=true;</script>
<script type="text/javascript" src="http://w.sharethis.com/button/buttons.js"></script>
<script type="text/javascript" src="http://s.sharethis.com/loader.js"></script>


Now save the template.
Process 1 is finished.

Process 2:

Now click “Layout” option. Here you will get a “Add a gadget” option to add something. From this option select “HTML/Java Script”. A box will open. 


Here you will see two blank options. One is Title and another is Textbox. You may keep blank the Title option. Now paste the bellow code in the text box.

Code:


<script type="text/javascript">stLight.options({publisher: "c117a274-6da3-437e-8e5b-63a46ebfe6af"});</script>
<script>
var options={ "publisher": "c117a274-6da3-437e-8e5b-63a46ebfe6af", "position": "left", "ad": { "visible": false, "openDelay": 5, "closeDelay": 0}, "chicklets": { "items": ["facebook", "twitter", "linkedin", "reddit", "googleplus", "delicious", "pinterest", "email", "sharethis"]}};
var st_hover_widget = new sharethis.widgets.hoverbuttons(options);
</script>


 Now save it. You have done it. Visit your blog and you will see the floating sharing widget.


Note:
If you like this post please give your valuable comment and visit this site regularly to get more tips and tricks for blogger.


What is Blogger?

Hello friends! How are you? In my post I will share with you about blogger or blogspot. Do you know what is blogger or blogspot? www.blogger.com is a platform where you can create a free blogsite. For free blogging this site is very popular. This site is a service of Google. As it is easy to create a blog site, so it is very popular. To create a site from here you need not to know HTML or any program. Just log in to this site with your g-mail account.


History of blogger(In short): Blogger was started since 23rd August 1999. First it is established by “PAIRA LABS”. But in 2003 Google bought it. At present it is conducted by Google Server. Their sub domain is blogspot.com. To help people for blogging Google started this service. From that year Google is trying to make it too easy.

Note:
If you like this post please give your valuable comment and visit this site regularly to get more tips and tricks for blogger.


Make Posts For Your Blog

Dear visitor this post is for them who are new in blogger. Through this post a new blogger can learn how to make a post in blogger. If we make a blog or website we need to make post for our visitor. If your blog doesn't have any post your visitors don't enter your blog. If visitors don't come to your blog your all industry will end in smoke. So follow me and learn how to make post in blogger.
=> First go to www.blogger.com.
=> A new page will open like bellow image.

=> In this page you will see your blog and click your blog title. After clicking again a new page will open. See bellow.............


=> Here you will see you "Dashboard". From here click "New post" (left side of this page). Now you will get another window.

=> Here you will see two blank space. One is for "Title". Another is for posting. In "Title" space you have to select a title for your post. Then start writing.
=> After your posting click publish(Top right side of the page).
Now visit your blog and see your post.